Amazon.Sa Seller Central Account Setup

 To set up an Amazon Seller Central account, you must go through five well-defined steps. We’ll discuss the process and the documentation you’ll need.

In my hometown, there is a Sunday morning food market. For many years, a middle-aged lady would be there every weekend selling her own dairy products. We were lining up to buy her products. They were of great quality, and she was so proud of them.

But before getting to the market, she would have gone through the long process of making her products, preparing them for transportation, and deciding on her price range and the layout of her market booth.

As you get ready to set up your Amazon Seller Central account, this is exactly where you stand. Your products are ready, your business is up and running, you know your pricing, your brands are registered as trademarks, and your fulfillment solution is operational. All you need is to step into the marketplace and find the buyers to start selling online.

Today, you will do just that by setting up an Amazon Seller account. You have gathered your business and personal addresses and phone numbers, bank account details, and a chargeable credit card and scanned identity papers and bank statements.

So, let's do it. Set up your Amazon Seller account by following the five steps below. Or you can use this walk-through to make sure you have gathered all the necessary information as the delay for verification can be long if documents are unclear or missing.

The Amazon Seller Central website.

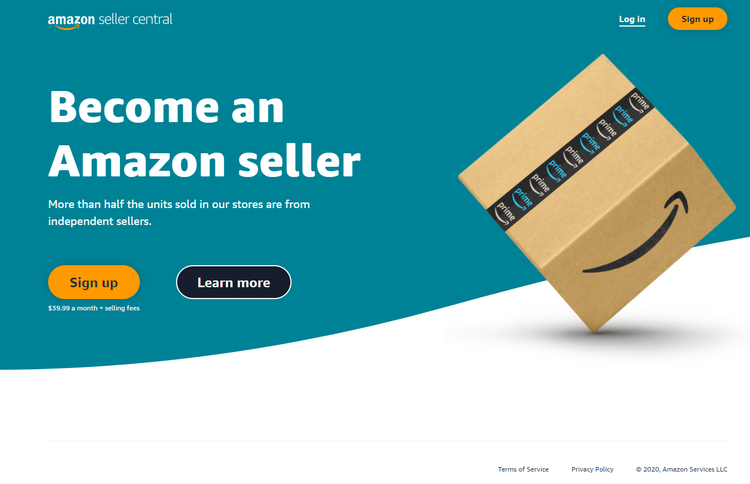
Go to Amazon Seller Central to start the account creation process. Image source: Author

1. Start the Seller Central account creation

You need to go to the Seller Central website to start the account creation process. We assume you are going to set up a professional seller account and not a personal account for occasional sales. Your account can work as an Amazon reseller account if you are in the business of arbitrage or dropshipping.

In the first step, you are asked to provide the following business information:

  • Business location
  • Business type
  • Business name
  • Company registration number
  • Registered business address (verifiable)
  • Phone number (verification)
  • Primary contact person

Make sure that you enter your business address and phone number correctly as that information is being verified. In some cases, Amazon could send a letter to the registered address and there is a systematic mobile phone verification via SMS or a call.

The business information step in the Seller Central setup.

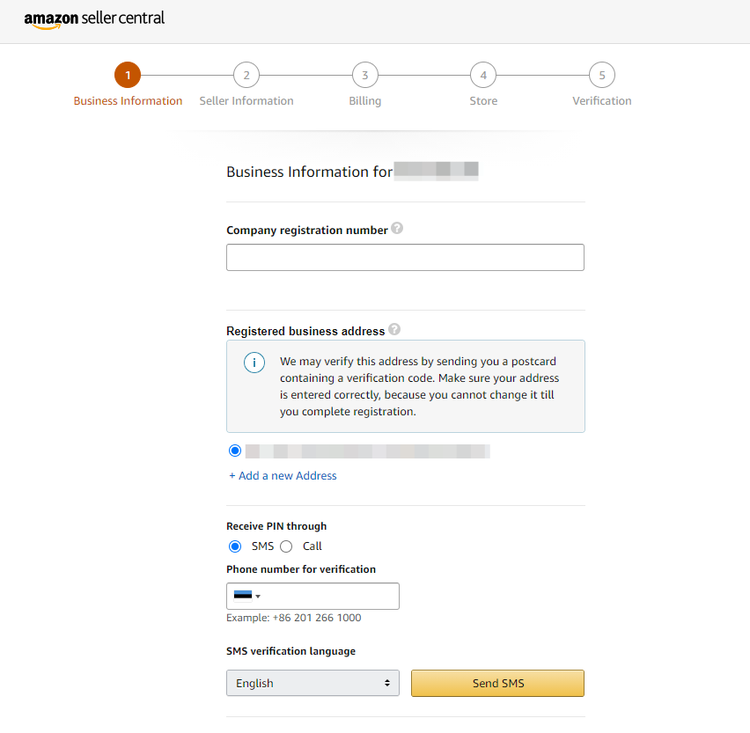
In the first stage of the Amazon Seller setup, you provide information about your business. Image source: Author


2. Enter your seller information

Your business information is always connected with your personal seller information, which is what you provide in the second step of the seller registration.

Seller information you provide in this step includes:

  • Country of citizenship
  • Country and date of birth
  • Proof of identity with the expiration date and country of issue
  • Residential address
  • Mobile phone number
The seller information step in the Seller Central setup.

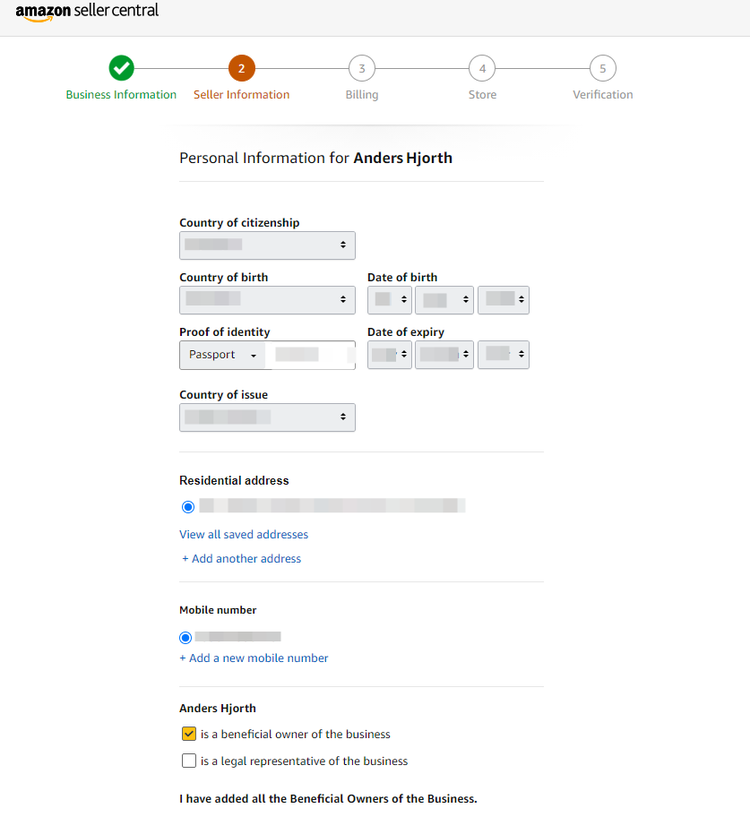
In the second step of the seller registration, you provide personal information for the business representative. Image source: Author

3. Provide billing information

When you are doing business on Amazon you receive payment for goods sold, and you pay a fee for being on the platform. This is why you provide both a bank account where money can be deposited and a credit card where fees can be charged.

The billing information step in the Seller Central setup.

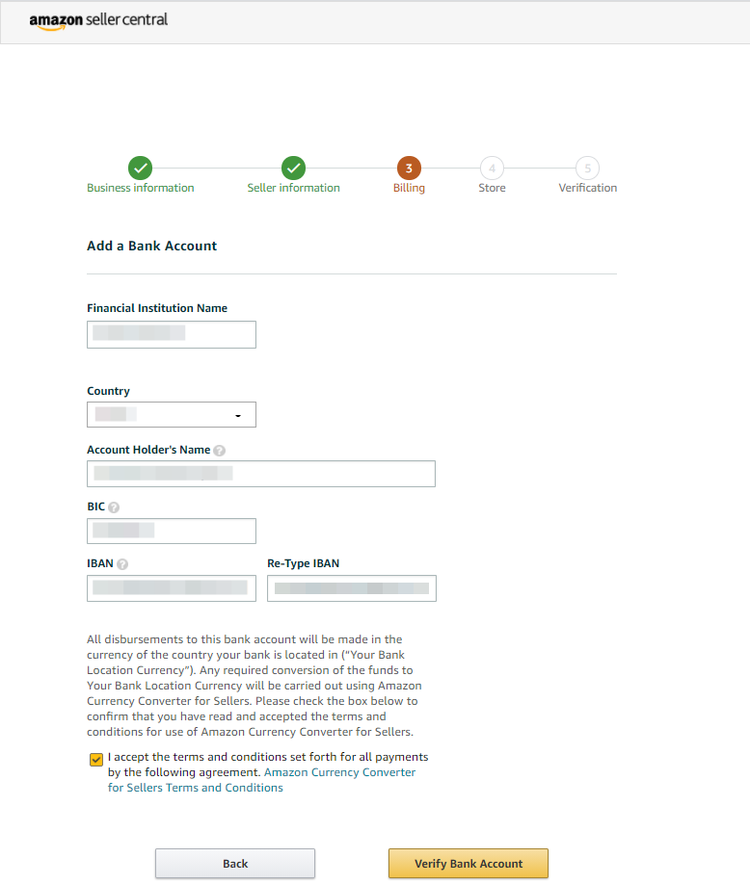
In the third step of the Amazon Seller Central setup, you provide bank payment and credit card information. Image source: Author

4. Store creation

Reaching the fourth step of the Seller account setup, you will already be in the process of providing marketing information for your e-commerce store.

In this step, you will provide your store name and answer the following questions:

  • Do you have Universal Product Codes (UPC) for your products?
  • Are you the manufacturer or brand owner?
  • Do you have government-registered trademarks for the branded products you plan to sell?
The Store information step in the Seller Central setup.

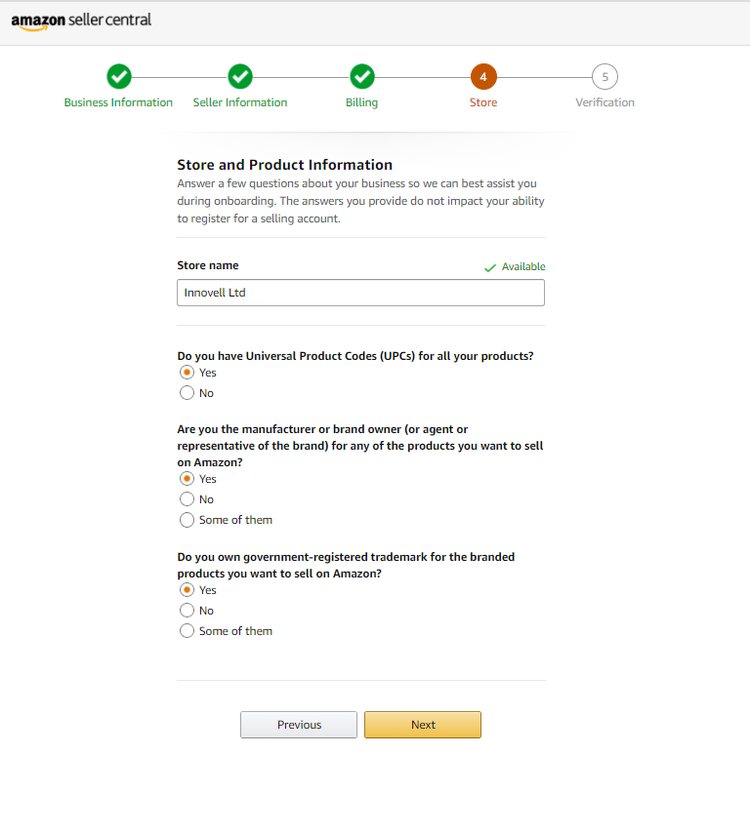
In the fourth step of the process, you provide information about your store and your products. Image source: Author

5. Verifying your information

At this final stage of the process, you need to upload a copy of your identity document as well as documentation for your bank account. Once these elements have been submitted, all you can do is wait for Amazon to get back to you by email to confirm the creation of your Seller account.

The verification step in the Seller Central setup.

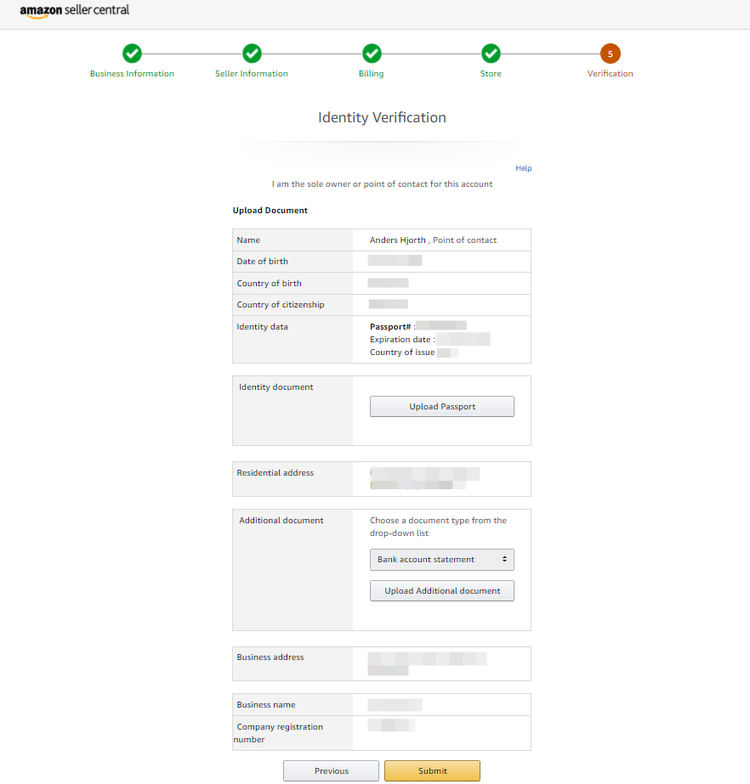
In the final step of the Amazon Seller Central registration, your information is reviewed and verified. Image source: Author

The verification process can take time because of regulation and the sheer number of account creations. It can take a day, a week, or several weeks. The clearer your documentation, the shorter the delay. The latest account registration mentioned to me took four business days, but if the documentation can't be verified, the delay can last months or indefinitely.

Once you receive the verification email, you can connect to your Amazon Seller Central account and start configuring your product listings.

An activated Amazon Seller Central account.

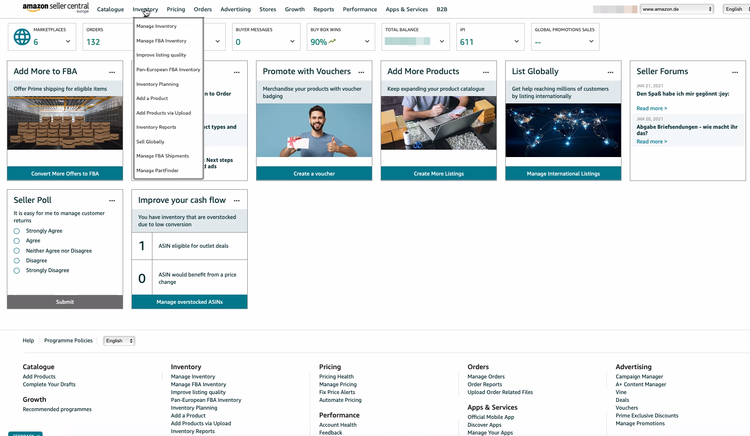
When you are up and running on Amazon Seller Central, your dashboard provides access to account management functions and key statistics. Image source: Author

Set up and verified, the adventure can commence

Some will say the challenge only starts now that you are launching your sales and marketing, but in reality, the process that brought you to this point has helped prepare you for facing clients and competitors.

Your brand, product design, price points, and fulfillment mode will all be variables you use in your marketing mix to activate your business activity. Now everything can come into play to accelerate your sales.

Alert: highest cash back card we've seen now has 0% intro APR until 2024

If you're using the wrong credit or debit card, it could be costing you serious money. Our experts love this top pick, which features a 0% intro APR until 2024, an insane cash back rate of up to 5%, and all somehow for no annual fee. 

In fact, this card is so good that our experts even use it personally. Click here to read our full review for free and apply in just 2 minutes. 

Read our free review

7 Apps That Will Amplify Your macOS

One of the best things about owning a Mac computer is the availability of impressive macOS apps in each category, from interface customization to productivity to entertainment to security. You can either get them from Apple’s App Store or third-party developer sites for free.


Whether you are a new Mac user or are well-familiar with all the features that macOS gives you access to, there are apps that you will find helpful.

Amphetamine


The app prevents your computer from falling into sleep mode or going into auto-dim. It also prevents screensaver from appearing automatically after a few minutes of inactivity. Make sure to download the app from a legitimate source after analyzing the link carefully.

Amphetamine is an ideal option for users while they are watching movies or streaming videos. It prevents that annoying distraction that you deal with when the screen goes to sleep mode while you are watching a video.
Swift Publisher

Sometimes, you need to create your intuitive stationery, particularly when you are starting something new. Swift Publisher allows you to save extra money while giving you the chance to display your creativity. You can create brochures, flyers, business cards, and similar marketing collateral.

Once your content is ready, the next task involves printing it on a piece of paper. If you have a printer at home, printing the letterhead or a business card may not be a challenge. What if you need to print brochures as you need to get them double-sided on paper? Visit https://setapp.com/how-to/print-double-sided to get complete information on duplex printing.

Notion


The app is a multi-purpose utility that works as a calendar, database, note-taking, Kanban board, and even more. The Notion is an appropriate app for project management, social media calendars, story writing, or anything that you imagine doing on your computer.

The app is appropriate for users who need to handle numerous tasks as part of their work commitment. This way, you do not have to install multiple apps for various tasks that will help you prevent some space on the storage media.
Wondershare Filmora

It’s time to save some bucks with the finest video editing app available online. One of the best things about Wondershare Filmora software is that it is available free for macOS users. Apart from that, it supports a wide variety of video formats and provides 300+ impressive effects to add to the video.

The software allows you to swap backgrounds and add special effects while you are editing a video. Showcasing multiple clips on a single screen is easy, and you can even track the movement of a car or a person, or any other moving object in the digital videos.
Hazel

When you need an organization app on your computer, Hazel can be the best pick as it allows for easy file management. Create your custom rules to help the app recognize, manage, sort, and move the files stored on your computer.

You can use this app at work as well as your home computer for managing all your files like a breeze. File management is easy with Hazel whether you want to name your files, add tags, apply rules to the files and folders. Automate the way you organize your content on macOS by downloading Hazel from a trustworthy source.
Spotify

If you love listening to podcasts or music, Spotify is the place to go. Get access to a whole lot of the Spotify catalog and search and listen to your favorite song free of charge. The good thing is that Spotify is available for macOS, iOS, and other operating systems. So whether you are a Mac user or have an Android phone, you can install Spotify.

Another significant feature is that you can select to stream content in your native language, which makes it even more practical to download the app. You can build and play your custom playlist to listen to rock or hip-hop or any genre you like the most. Although you can listen to the content for free, upgrade to Spotify Premium to enjoy exclusive features.
Steam


Now this one is for gamers. Valve Software offers Mac-compatible versions to allow macOS users to enjoy their favorite games. Games you purchased to play on Linux or Windows are playable on macOS if a supported version is available. Steam is available for everyone, regardless of the operating system you use.

Using Steam, you don’t have to purchase and install a dedicated macOS version of the game, which will save you time. If your Mac is not capable of handling high-end tasks, you can try Steam Remote Play on a Windows computer that has the oomph to play heavy games. For enhanced gameplay on Mac, you can invest in a PlayStation 4 or the Xbox One controllers.

সেরা ২০ টি কম্পিউটার টিপস ট্রিক্স বাংলায়↓

কম্পিউটার টিপস /ট্রিক্সকম্পিউটার হয়ে যাক আরও গতিশীলComputer tips & tricks bangle 1


GO “ RUN “ – tree লিখে এন্টার করুন।

GO “ RUN “ – prefetch লিখে এন্টার করুন।( একটা নতুন উইন্ডো আসবে সব ফোল্ডার এবং ফাইল ডিলিট করুন।

GO “ RUN “ – temp লিখে এন্টার করুন। এখন টেম্পোরারী ফাইল গুলো ডিলিট করুন।

GO “ RUN “ – %temp% লিখে এন্টার করুন। এখন টেম্পোরারী ফাইল গুলো ডিলিট করুন।

প্রতিটা ড্রাইভের উপর মাউসের রাইট বাটুন ক্লিক করুন তারপুর প্রপারট্রিজ ক্লিক করুন ডিস্ক ক্লিনআপ ক্লিক করুন। আশা করি আপনার কম্পিটার অনেক গতি বেড়ে যাবে। পুরাতন কম্পিউটার এর জন্য বেশী কার্যকরী।


কম্পিউটারের প্রসেসরের মান বা কাজের তুলনায় স্পীড কম হলে

কম্পিউটার ্যামের তুলনায় বেশী পরিমাণ কাজ করলে।আপনার কম্পিউটার ্যাম এর পরিমাণ কম কিন্তু আপনি অনেক বড় বড় কয়েকটি প্রোগ্রাম চালু করলেন। তাহলে তো হবেই।

কম্পিউটার হার্ডডিক্স এর কানেকশন এবং প্রসেসরের কানেকশন ঠিকমত না হলে, বার বার একই সমস্যা হতে পারে

যদি বার বার হ্যাং হয় তাহলে Cooling Fan টা check করেন এটা স্পীডে গুরছে কিনা।

hard disk Bad sector থাকলে বা অন্য কোন হার্ডওয়্যারে ত্রুটি থাকলে।

অপারেটং সিস্টেমে ত্রুটি থাকলে মানেকোনো সিস্টেম ফাইল file delete হয়ে যাওয়াকে বুঝায়। যার কারণে কম্পিউটারে সমস্যা হতে পারে।

কম্পিউটার ভাইরাস দ্বারা আক্রান্ত হলে সাধারণত Hang হতে পারে।

এই কারণেই কম্পিউটারে বেশী Hangহয়। আর এই ভাইরাস অপারেটিং সিস্টেমের কিছু ফাইলের কার্যপদ্ধতিকে বন্ধ করে দেয় যার কারণে কম্পিউটার প্রয়ই হ্যাং হয়। কম্পিউটারে অতি উচ্চ মানের এন্টি ভাইরাস ব্যবহার করুন।


হাই গ্রাফিক্স সম্পন্ন গেইম চালালে তখন ্যাম সম্পূর্ণ লোড হয়ে যায় এবং hang হওয়ার সম্ভনা থকে।

কম্পিউটারের ফাইলগুলো এলোমেলোভাবে সাজানো থাকলে তার জন্য hang হওয়ার সম্ভনা থকে। refresh চাপেন এবং RUN গিয়ে tree চাপেন।


কম্পিউটার টিপস /ট্রিক্স2Computer tips & tricks bangla

মনিটর ছবি দেখা না গেলে- Confirm হন যে মনিটরটি on. এবং brightness control চেক করুন , এবং এটি ঠিক মত সেট হয়েছে কিনা খেয়াল করুন। মনিটর এর সকল কানেকশন চেক করুন এবং surge protector surge protector টি চালু কি না চেক করুন।


কম্পিউটার টিপস /ট্রিক্স3Computer tips & tricks bangla

কিছু সময় পরপর Start থেকে Run- ক্লিক করে tree লিখে ok করুন। এতে ্যামের কার্যক্ষমতা বাড়ে।


কম্পিউটার টিপস /ট্রিক্স4Computer tips & tricks bangla

Ctrl + Alt + Delete চেপে বা টাস্কবারে মাউস রেখে ডান বাটনে ক্লিক করে Task Manager খুলুন।তারপর Processes- ক্লিক করুন। অনেকগুলো প্রোগ্রাম-এর তালিকা দেখতে পাবেন। এর মধ্যে বর্তমানে যে প্রোগ্রামগুলো কাজে লাগছে না সেগুলো নির্বাচন করে End Process- ক্লিক করে বন্ধ করে দেন। যদি ভুল করে কোনো প্রোগ্রাম বন্ধ করে দেন এবং এতে যদি অপারেটিং সিস্টেম এর কোন সমস্যা হয় তাহলে কম্পিউটার রিস্টার্ট করুন।


কম্পিউটার টিপস /ট্রিক্স5Computer tips & tricks bangla

প্রতি সপ্তাহ একবার আপনার hard drive Defragment এবং disk cleanup করুন।(1. click start – all programs – accessori – system utility – Defragment drive utility

2. click start – all programs – accessori – disk cleanup)


কম্পিউটার টিপস /ট্রিক্স6Computer tips & tricks bangla

পিসি সেফ মোডে চালু হলে কি করবেন?


উইন্ডোজ অপারেটিং সিস্টেম স্বাভাবিকভাবে চালু হতে না পারলে অনেক সময় সেফ মোডে চালু হয়৷ সেফ মোড হলো উইন্ডোজের বিশেষ একটি অবস্থা যখন এটি একেবারে প্রয়োজনীয় ফাইল এবং ড্রাইভারসমূহ নিয়ে লোড হয়৷ বলা যেতে পারেবিপদকালীনঅবস্থা যখন নূন্যতম রসদ দিয়ে প্রাণে বেচে থাকাটাই গুরুত্বপূর্ণ৷ সেফ মোডে উইন্ডোজ চালু হলে প্রাথমিক ভাবে রিস্টার্ট করে দেখা যেতে পারে পুনরায় স্বাভাবিকভাবে তা চালু হয় কিনা৷ বার বার করে ব্যর্থ হলে বুঝতে হবে সমস্যাটি গুরুতর৷ উইন্ডোজের কোনো গুরুত্বপূর্ণ ফাইলের ক্ষতি বা হার্ডওয়ারের সমস্যার কারণে তা হতে পারে৷ কোনো নতুন হার্ডওয়্যার সেটিংস পরিবর্তনের ফলে যদি উইন্ডোজ বার বার সেফ মোডে চলে যায় তবে পূর্ববর্তী সেটিংসটি রিভার্স করে ফেলাই শ্রেয়৷ সেফ মোডকে এজন্য ডায়াগনিস্টিক মোডও বলা হয়৷ উইন্ডোজ চালু হওয়ার সময় F8 চাপলে যে মেনু আসে সেখান থেকে সেফ মোড চালু করা যেতে পরে৷ তবে আগেই বলা হয়েছে; এটি ডায়াগনিস্টিক মোড৷ এই মোডে বাড়তি কোনো কিছুই যেমন- সাউন্ড, প্রিন্টার, হাই কালার ডিসপ্লে ইত্যাদি কিছুই কাজ করবে না৷.

কম্পিউটার টিপস /ট্রিক্স7Computer tips & tricks bangla

আপনার hard disk দুইটি partition করুন এবং সেকেন্ড পার্টিশনে Install করুন সব large Softwares (like PSP, Photoshop, 3DS Max etc). Windows এর জন্য আপনার C Drive যথাসম্ভব খালি রাখুন যাতে Windows RAM full হওয়ার পর আপনার C Drive কে virtual memory হিসেবে use করতে পারে।


কম্পিউটার টিপস /ট্রিক্স8Computer tips & tricks bangla

আপনার পিসি পুরো বুট না হওয়া পযর্ন্ত কোন application open করবেননা।


কম্পিউটার টিপস /ট্রিক্স9Computer tips & tricks bangla

যে কোন application close করার পর আপনার desktop F5 চেপে refresh করে নিন, যা আপনার পিসির RAM হতে unused files remove করবে।


কম্পিউটার টিপস /ট্রিক্স10Computer tips & tricks bangla

.ডেস্কটপ wallpaper হিসেবে very large file size image ব্যবহার হতে বিরত থাকুন।

ডেস্কটপে অতিরিক্ত shortcuts রাখবেননা। আপনি জানেন কি ডেস্কটপে ব্যবহৃত প্রতিটি shortcut up to 500 bytes of RAM ব্যবহার করে।


কম্পিউটার টিপস /ট্রিক্স11Computer tips & tricks bangla

প্রতিদিন আপনার ডেস্কটপের recycle bin Empty করে রাখুন। (The files are not really deleted from your hard drive until you empty the recycle bin.)


কম্পিউটার টিপস /ট্রিক্স12Computer tips & tricks bangla

অনেক সময় PC’ র‍্যাম কম থাকলে PC slow হয়ে যায়। ভার্চুয়াল মেমোরি বাড়িয়ে কিছুতা গতি বাড়ানো যায়। এর জন্য- My Computer মাউস রেখে right button ক্লিক করে properties-e যান। এখন advance ক্লিক করে performance এর settings ক্লিক করুন। আবার advance - ক্লিক করুন। এখন change ক্লিক করে নতুন উইন্ডো এলে সেটির Initial size Maximum size- আপনার ইচ্ছামত size লিখে set- ক্লিক করে ok দিয়ে বেরিয়ে আসুন। তবে Initial size আপনার PC’ র‍্যামের দ্বিগুণ এবং Maximum size র‍্যামের চারগুন দিলে ভাল হয়।


কম্পিউটার টিপস /ট্রিক্স 13Computer tips & tricks bangla

ছাড়াও কম্পিউটার ভাল রাখার কিছু টিপ্স জেনে নিন


প্রতি বা মাস পর পর কম্পিউটার খুলে সব parts মুছে নতুন করে লাগিয়ে দিন।

Ram খুলে পাতলা তুলো দ্বারা মুছে নতুন করে লাগিয়ে নিন।

কম্পিউটারের উপর কোন ভারী কিছু রাখবেন না।

রাতে ঘুমাবার সময় কম্পিউটার shut down করে দিন।

বিদু্ৎ চলে গেলে যেন কম্পিউটার বন্ধ না হয়ে যায় সে জন্য UPS ব্যবহার করা উচিৎ।

কম্পিউটার VIRUS দূর করার জন্য অ্যান্টিভাইরাস ব্যবহার করা উচিৎ।

কম্পিউটারকে আলো-বাতাসপূর্ণ জায়গায় রাখুন।

প্রতিদিন মনিটর, বিশেষ করে LCD মনিটর একবার করে মুছে রাখবেন।

অনেকে কম্পিউটার চলার সময়ও CPU- উপর আলাদা পর্দা দিয়ে রাখেন, যাতে ময়লা প্রবেশ না করে। এতে আরও ক্ষতিই হয়।

ওয়ালপেপার হিসেবে এমন ছবি সেট করুন, যা আপনার চোখকে আরাম দেয়। ওয়ালপেপার সাইজে যত ছোট হবে, আপনার কম্পিউটারের গতির জন্য ততই ভাল।

নিয়মিতকুলিং ফ্যানমুছে পরিষ্কার করে রাখুন।

কম্পিউটার টিপস /ট্রিক্স14Computer tips & tricks bangla

কম্পিউটারের ্যা কম থাকলে কম্পিউটার ধীর গতির হয়ে যায়। ভার্চুয়াল মেমোরি বাড়িয়ে কম্পিউটার গতি কিছুটা বাড়ানো যায়। ভার্চুয়াল মেমোরি বাড়ানোর জন্য প্রথমে My computer- মাউস রেখে ডান বাটনে ক্লিক করে properties- যান। এখন Advance- ক্লিক করে performance এর settings- ক্লিক করুন। আবার Advance- ক্লিক করুন। এখন change- ক্লিক করে নতুন উইন্ডো এলে সেটির Initial size Maximum size- আপনার ইচ্ছামত size লিখে set- ক্লিক করে ok দিয়ে বেরিয়ে আসুন। তবে Initial size- আপনার কম্পিউটারের ্যা মের size-এর দ্বিগুন এবং Maximum size- ্যা মের size-এর চারগুন দিলে ভাল হয়।


কম্পিউটার টিপস /ট্রিক্স15

যে কোন Software uninstall করার সময় ……কন্ট্রোল প্যানেলে যান। Add or Remove- দুই ক্লিক করুন। Add/Remove windows components- ক্লিক করুন। নতুন যে উইন্ডো আসবে সেটির বাম পাশ থেকে অদরকারি প্রোগ্রামগুলোর পাশের টিক চিহ্ন তুলে দিন। তারপর Accessories and Utilities নির্বাচন করে Details- ক্লিক করুন। নতুন যে উইন্ডো আসবে সেটি থেকে যে প্রোগ্রামগুলো আপনার কাজে লাগে না সেগুলোর টিক চিহ্ন তুলে দিয়ে OK করুন। এখন next- ক্লিক করুন। Successful meassage আসলে Finish- ক্লিক করুন।


কম্পিউটার টিপস /ট্রিক্স16

প্রত্যেকবার কম্পিউটার অন করার সময় বিভিন্ন ড্রাইভ চেকিং অপশন আসে যেমনঃ- Checking Drive E:


কম্পিউটার টিপস /ট্রিক্স17

Press any key to canceled এর সমাধান…..

>স্টার্ট থেকে রানে লিখুন সিএমডি (cmd) এবার এন্টার চাপুন।

>এরপর লিখুন সিএইচকেএনটিএফএস-স্পেস-ড্রাইভ লেটার (E:) স্পেস ব্যাকস্লাস(/)এক্স অর্থাতঃ (chkntfs E: /X) লিখে এন্টার দিন ব্যাস এবার কম্পিউটার রিস্টার্ট দিন।


কম্পিউটার টিপস /ট্রিক্স18

তৈরি করুন একটি অদৃশ্য ফোল্ডার একটি New Folder তৈরি করুন, যখন New Folder লিখাটি নীল রং সিলেক্ট করা থাকবে তখন keyboard এর ডান পাশের Alt চেপে ধরে 0160 চাপুন, এবার Alt key থেকে আঙুল সরিয়ে নিন এবং Enter ক্লিক করুন। এবার দেখুন একটি নাম ছাড়া ফোল্ডার তৈরি হয়েছে এখন এই নাম ছাড়া Folder mouse এর right buttome ক্লিক করে Properties যান, তারপর customize > change icon ক্লিক করুন, তারপর icon window থেকে একটি blank icon সিলেক্ট করুন এবং ok তে ক্লিক করুন। এবার দেখুন আপনি একটি অদৃশ্য Folder তৈরি করেছেন।


কম্পিউটার টিপস /ট্রিক্স19

অনেক সময় START MENU SHOW করতে দেরি হয় বা LOCAL DISK ‍এর যে কোন পেজ ওপেন করতে দেরি হয় যা খুব বিরক্তিকর।এ‍ই সমস্যা থেকে মুক্তি পেতে নিচের পথ অনুসরন করুন। প্রথমে START MENU থেকে RUN ক্লিক করুন। তাতে REGEDIT.EXE লিখে OK করুন। REGISTRY EDITOR BOX আসবে, সেখান থেকে HKEY_CURRENT_USER ট্যাবে ক্লিক করুন তারপর সেখান থেকে CONTROL PANEL হয়ে DESKTOP ক্লিক করুন। DESKTOP ক্লিক করার পর ডান পাশের BINARY DATA হতে MENUSHOWDELAY তে ডাবল ক্লিক করুন। যে EDIT STRING BOX ‍আসবে তা হতে VALUE DATA “0” করে OK করুন। তারপর কম্পিউটার RESTART করুন। দেখবেনআপনার কম্পিউটারআগের তুলোনায় দ্রুত গতি সম্পন্ন হয়েছেএবং LOCAL DISK পেজ OPEN হতে সময় কম নিচ্ছে।

কম্পিউটার টিপস /ট্রিক্স20

কি বোর্ডের সাহায্যে চালু করুন কম্পিউটার

আমরা সাধারণত CPU-এর পাওয়ার বাটন চেপে কম্পিউটার চালু করি। কিন্তু অনেক সময় দেখা যায়, পাওয়ার বাটনে কোনো সমস্যা থাকলে কম্পিউটার চালু করতে অনেক কষ্ট হয়। আমরা ইচ্ছা করলে CPU-এর পাওয়ার বাটন না চেপে কি-বোর্ডের সাহায্যে খুব সহজেই কম্পিউটার চালু করতে পারি। এর জন্য প্রথমে কম্পিউটার চালু হওয়ার সময় কি-বোর্ড থেকে Del বাটন চেপে Bios- প্রবেশ করুন। তারপর Power Management Setup নির্বাচন করে Enter চাপুন। এখন Power on my keyboard নির্বাচন করে Enter দিন। Password নির্বাচন করে Enter দিন। Enter Password- কোনো একটি কি পাসওয়ার্ড হিসেবে দিয়ে সেভ (F10) করে বেরিয়ে আসুন। এখন কি-বোর্ড থেকে সেই পাসওয়ার্ড কি চেপে কম্পিউটার চালু করতে পারেন। এই পদ্ধতিটি গিগাবাইট মাদারবোর্ডের ক্ষেত্রে প্রযোজ্য। অন্যান্য মাদারবোর্ডেও এই পদ্ধতি পাওয়া যাবে।


শেয়ার করে রাখতে ভুলবেন না। যে কোন সময় কাজে লাগতে পারে।


Subscribe Us